A Guide to Tracking Facebook Ads
When you're running Facebook ads, you need a way to connect your ad spend directly to actual business results. I'm not talking about simple metrics like clicks or likes; I mean real sales and qualified leads. This is where effective tracking comes in. It's all about using tools like the Meta Pixel and Conversions API to get a crystal-clear picture of which campaigns are making you money and which are just burning through your budget.
This data-driven approach is non-negotiable if you want to optimize your spending and scale the campaigns that actually work.
Why You Can't Afford to Guess with Facebook Ad Tracking
If you're putting money into Facebook ads, you absolutely have to know what's working. Without precise tracking, you’re flying blind. You're basically gambling with your ad budget, wasting it on campaigns that feel right but don't deliver, and missing huge opportunities to double down on your winners.
A solid tracking foundation is the single most important part of a profitable advertising strategy. It’s the difference between making educated, data-driven decisions that grow your business and just guessing. The entire Facebook advertising machine is built on this principle. That’s why its ad revenue hit a mind-boggling $114.93 billion in 2021 alone—a 36.5% jump from the year before, with ads making up over 97% of its total revenue. You can dig into more of Facebook's advertising growth and statistics at Oberlo.com.
From Clicks to Real Conversions
Let me paint you a picture I've seen countless times: a small e-commerce brand is spending thousands on ads. They’re getting a ton of clicks, but sales are flat. Their first assumption? The ads aren't working.
But after we helped them fix their tracking, they found the real culprit: their "Add to Cart" event wasn't firing correctly.
Accurate tracking doesn't just show you the first click; it reveals the entire customer journey. It tells you which ad creative led to a purchase and which audience is most valuable, giving you the confidence to move your budget where it will make the biggest impact.
Once they fixed that single tracking issue, they discovered people were adding items to their carts but were dropping off at the checkout page. The problem was never the ad—it was their clunky checkout process. Armed with that insight, they streamlined their checkout flow and doubled their return on ad spend (ROAS) in less than a month.
To get a deeper understanding of how to connect your ad clicks to meaningful actions on your site, check out this guide to Unlock ROI with Facebook Ads Conversion Tracking.
Building Your Foundation with the Meta Pixel

Before you can track anything meaningful, you need to get the Meta Pixel on your website. Think of it as your inside agent. It’s a tiny snippet of code that watches what people do on your site after they click your Facebook ad. This is the absolute starting point for any real Facebook ads conversion tracking.
Without it, you're flying blind. You can see clicks, sure, but you have no idea if those clicks led to a sale, a lead, or just a quick bounce. The Pixel is what connects the dots, feeding that crucial data back into Ads Manager so you know which campaigns are actually making you money.
This data is gold because it’s what teaches Facebook’s algorithm who to show your ads to.
Getting the Pixel Up and Running
Putting the Pixel on your site sounds way more technical than it usually is. Most businesses can get this done in a few minutes, and you generally have two ways to go about it.
- Use a Partner Integration: If you're on a platform like Shopify, WordPress, or WooCommerce, you're in luck. They have built-in integrations that do the heavy lifting for you. You just find the Meta Pixel section in your settings, copy-paste your Pixel ID, and you're done. This is the easiest and most reliable route.
- Install It Manually: For custom-built sites, you’ll need to add the Pixel's base code directly into the
<head>section of your website’s code. You can grab this code snippet from your Facebook Events Manager.
Once it's installed, your first move should be to verify it's actually working. Grab the free Meta Pixel Helper extension for Chrome. It's a lifesaver. Just go to your website, click the little icon in your browser, and it will tell you if the Pixel is active and what it's tracking.
Telling the Pixel What Actions to Track
Now that your Pixel is installed, you need to tell it what specific actions matter to your business. In Facebook’s world, these are called standard events. While there are a bunch to choose from, a few are non-negotiable for almost any business.
- ViewContent: This one fires when someone looks at a key page, like one of your product pages. It's a great way to see which products are grabbing the most attention from your ads.
- AddToCart: This event tracks when someone adds an item to their cart. It’s a huge signal of buying intent. If you see a lot of these but not many sales, you might have an issue in your checkout process.
- Purchase: This is the big one. It fires on your "thank you" or order confirmation page, directly tying a sale back to the specific ad that brought the customer in.
When you set these up correctly, you’re giving Facebook’s algorithm the exact feedback it needs to find more people like your actual customers. This is what drives down your costs and cranks up your return on ad spend.
This kind of tracking is so critical because of Facebook's sheer scale. We're talking over 3 billion monthly active users. Out of that massive number, advertisers can potentially reach 2.28 billion people. By telling the Pixel what a "conversion" looks like for you, you're helping Facebook sift through that audience to find your perfect customers.
Improving Data Reliability with the Conversions API
The Meta Pixel is a powerful tool, but let's be honest—it's not perfect. As browsers get stricter with privacy and more people use ad blockers, relying only on the browser-based Pixel for your Facebook ad tracking is a recipe for data gaps. This is where the Conversions API (CAPI) comes in to save the day.
Think of CAPI as a direct, secure pipeline from your server straight to Facebook's. Instead of depending on a user's browser to fire off data, your server sends it directly. This server-to-server connection neatly sidesteps many of the roadblocks that trip up the Pixel, giving you far more reliable and complete data.
You can see here how defining your events in Facebook Ads Manager is the critical first step for both the Pixel and CAPI.
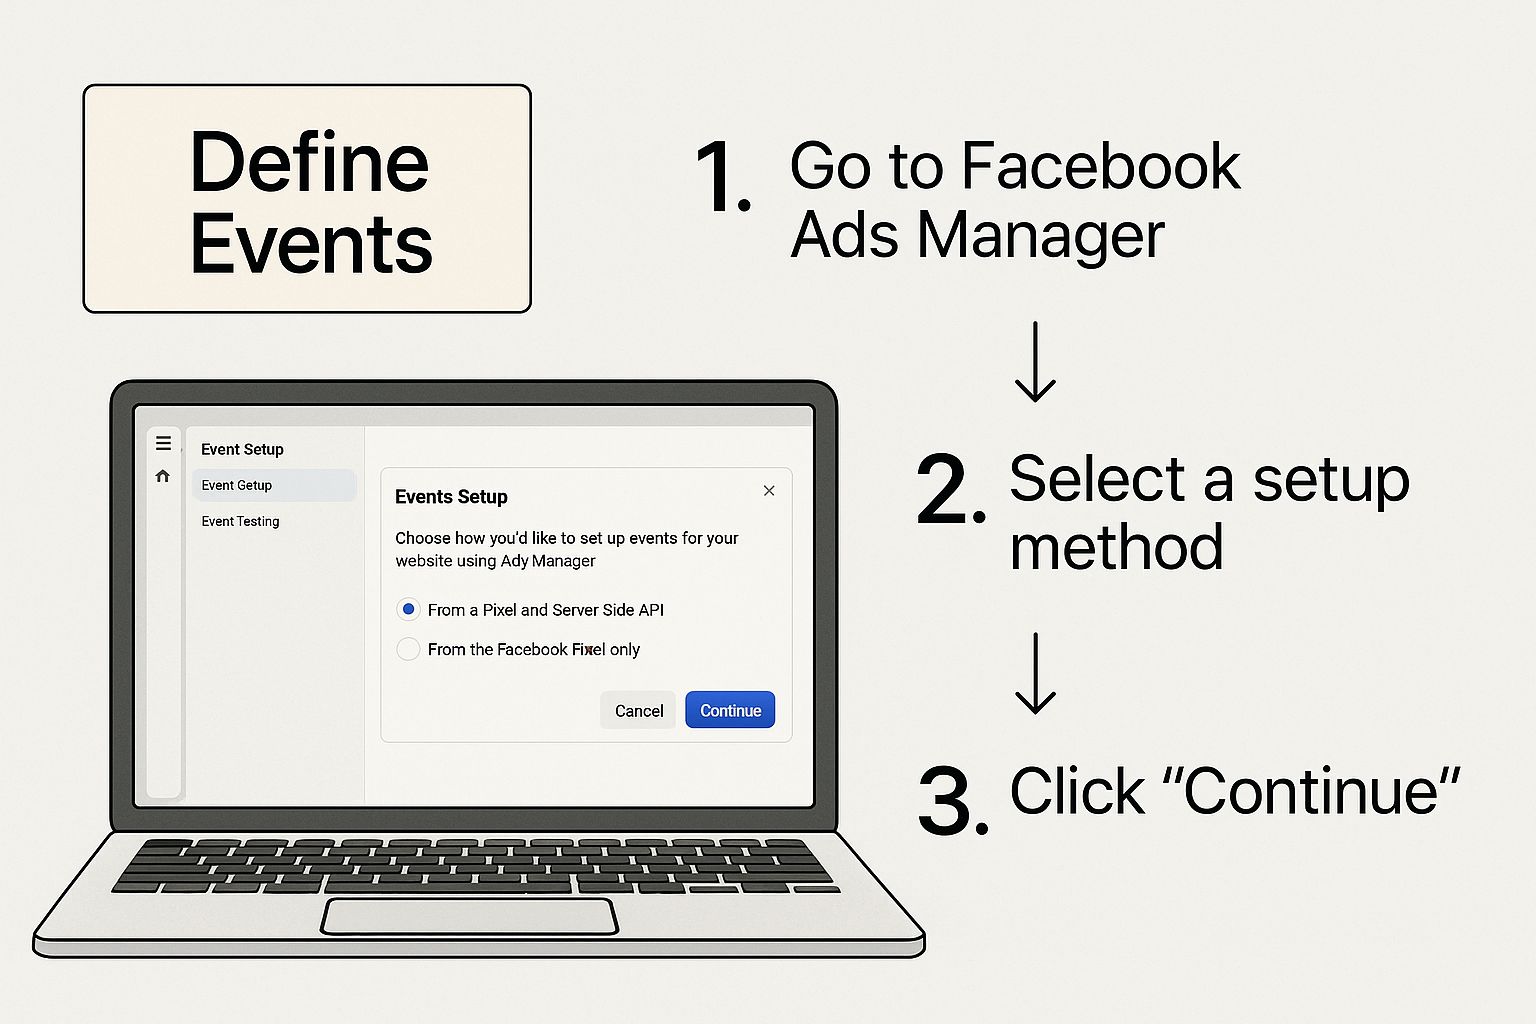
Whether it's a "Purchase" or a "Lead," getting these events clearly defined is the foundation for feeding accurate data back to Facebook, no matter if it's coming from a browser or your server.
Setting Up the Conversions API
The phrase "server-side tracking" sounds pretty technical, I know. But you don't need to be a developer to get CAPI up and running. Most major platforms have built-in integrations that make the setup surprisingly simple.
- For Shopify: You can flick on the Conversions API right inside your Facebook & Instagram sales channel settings. It's just a few clicks, and Shopify does all the heavy lifting for you.
- For WordPress/WooCommerce: The official Facebook plugins usually include CAPI integration, letting you enable it directly from your dashboard.
- Using Zapier: If you're managing leads in a CRM, you can use a tool like Zapier to send conversion events to Facebook automatically. For example, you could set it up to fire an event every time a deal is marked as "won."
This direct data connection is becoming non-negotiable. As we move through 2025, the ad ecosystem is all about efficiency. For instance, mobile-first campaigns are now driving 62% higher engagement than desktop ads, and you need rock-solid data to capitalize on that. With 221 million active users in North America's ad ecosystem alone, every piece of missing data is a missed opportunity.
Avoiding Double Counting with Deduplication
Okay, so if you're using both the Pixel and CAPI, you might be worried about counting the same conversion twice—once from the browser and once from the server. Fair point. Luckily, Facebook has a clever solution called event deduplication.
By giving each conversion event a unique ID, Facebook can tell when the same action gets reported from both sources. It simply keeps one event and tosses the duplicate, ensuring your data stays clean and your reporting is accurate.
This process is absolutely crucial. Without deduplication, your conversion numbers would be inflated, making your campaigns look much better than they actually are. It's the key to making a combined Pixel and CAPI strategy reliable for tracking Facebook ads.
This snapshot from Facebook's own documentation gives you a peek at how CAPI works under the hood.
It shows the direct flow of data from your server, which is exactly what gives this tracking method its power. For a deeper dive into making these tools work together, check out our guide to modern Facebook ad tracking.
By combining both methods, you build a resilient tracking system that captures more data and gives the algorithm everything it needs to find your best customers.
Gaining Granular Insights with UTM Parameters

While the Meta Pixel and Conversions API are fantastic for understanding what’s happening inside Facebook Ads Manager, they don’t tell the whole story. What happens after someone clicks your ad and lands on your site? That’s where you’re often flying blind.
To get that full picture, you need to connect the dots between your Facebook Ads and your website analytics, like Google Analytics. This is where UTM parameters come in—they are the secret sauce for tracking Facebook ads with pinpoint accuracy.
Think of UTMs as simple little tracking tags you tack onto the end of your URL. They don't actually change the destination page, but they carry a wealth of information over to your analytics platform. They tell you exactly which campaign, ad set, and even which specific ad creative drove that click. This is a level of detail you just can't get from Ads Manager by itself.
Deconstructing UTM Parameters for Facebook Ads
There are five core UTM parameters, and each one answers a critical question about where your traffic came from. Getting these right is the key to organizing your data and uncovering what's really working.
Let's break them down. Here’s a quick guide to what each parameter does and how we typically use them for tracking Facebook Ad campaigns.
UTM Parameter Breakdown For Facebook Ads
| UTM Parameter | Purpose | Example Value |
|---|---|---|
| utm_source | Identifies where the traffic is coming from. | facebook or instagram |
| utm_medium | Tells you the marketing medium. | cpc or paid_social |
| utm_campaign | Names the specific campaign you're running. | spring-sale-2025 |
| utm_term | Often used for keywords, but great for tracking the ad set. | lookalike-audience-us |
| utm_content | Differentiates between ad creatives. Gets super specific! | blue-product-video |
Using these parameters consistently lets you slice and dice your data in Google Analytics. You can finally see which ad headline generated the most engaged users or which video creative led to the highest time on page. That’s powerful stuff.
Building Your URLs and Maintaining Consistency
Nobody wants to type out those long, messy URLs by hand. That's just asking for typos and broken data.
The best way to handle this is with a dedicated tool. I always recommend Google's Campaign URL Builder. You just plug in your website URL, fill out the fields for each parameter, and it spits out a perfectly tagged URL ready for your ad.
The single most important rule of using UTMs is consistency. Decide on a clear naming convention from day one and stick to it. If you use
Once you build it, your final URL will look something like this:
https://yourwebsite.com/landing-page?utm_source=facebook&utm_medium=cpc&utm_campaign=summer-promo&utm_content=video-ad-1
This one link tells Google Analytics that the visitor came from a CPC ad on Facebook, was part of the "summer-promo" campaign, and clicked on the ad creative you named "video-ad-1." This is how you make smarter decisions, shifting your budget to the exact creatives that drive real results, not just vanity clicks.
Connecting Ads to Sales with LeadSavvy Pro
Alright, you’ve done the hard work. Your Pixel is firing, CAPI is sending data, and your UTMs are giving you beautiful, granular insights in Google Analytics. But let's be honest, there's still a massive disconnect. How do you actually connect a click from that one brilliant ad you ran last month to a real, paying customer who just closed a deal in your CRM?
This is the final, most crucial piece of the puzzle. It’s the difference between knowing your ads are generating leads and knowing they’re generating profit.
This is exactly where a tool like LeadSavvy Pro steps in. It’s built to bridge that gap between your ad platforms and your sales data, creating a single, unbroken line of sight from the first ad click all the way to the final sale. No more guesswork.
Integrating Your Ad and Sales Data
The whole process is designed to be surprisingly simple. You connect LeadSavvy Pro to your Facebook account and then link it to your website or lead forms. The moment a new lead comes in from one of your Facebook ads, the platform instantly captures all the important attribution data—the campaign, the ad set, and the specific ad creative—right alongside the person's contact info.
This combined packet of information is then pushed straight into your CRM. So, your sales team doesn’t just see "New Lead." They see a new lead that came from your "Spring Sale 2025" campaign after clicking on the "blue-product-video" ad. That context is pure gold for your sales reps.
The real magic happens weeks or months later when that lead finally becomes a customer. Since that original ad data is permanently attached to their contact record in your CRM, you can trace the actual revenue they generated directly back to the specific Facebook ad that brought them in.
This completely changes how you approach tracking Facebook ads. You stop tracking fuzzy "lead conversions" and start tracking cold, hard revenue. For a deeper dive into making this connection seamless, check out our guide on effective Facebook Lead Ads setup.
Calculating True Customer Acquisition Cost
With this final connection locked in, you can finally calculate your true customer acquisition cost (CAC) and prove the long-term ROI of your advertising. You’ll be able to answer the questions that really matter with complete confidence:
- Which of our Facebook campaigns brought in the most profitable customers?
- What was the exact ROAS for that video ad we ran last quarter?
- Are the leads from our lookalike audiences actually converting into higher-value deals than our interest-based audiences?
To make this all work, you need systems that can get this data to your sales team instantly. This is where you should explore how effective lead distribution software can perfectly complement your tracking setup.
By linking your ad performance directly to your sales revenue, you move way beyond surface-level metrics. You start making budget decisions based on what’s actually driving profit for your business.
Common Questions About Facebook Ad Tracking
Even when you think you’ve got everything wired up perfectly, tracking Facebook ads can still throw you a curveball. It’s totally normal. Data discrepancies, privacy updates, and random glitches can leave even the most experienced marketers scratching their heads.
Let's dive into some of the most common issues you'll probably run into.
Why Don't My Facebook and Google Analytics Numbers Match?
This is the big one. You log into Ads Manager and see one number, then pop over to Google Analytics and see something completely different. It's a classic problem, but it doesn't mean your tracking is broken.
The reason is simple: they use completely different attribution models.
- Facebook uses a view-through and click-through model. This means it might take credit for a sale if someone just saw your ad, didn't click, but came back to your site later to buy.
- Google Analytics, on the other hand, typically gives credit to the last non-direct click. It cares about the final touchpoint that brought the user to the site.
Neither is "wrong"—they're just measuring success through different lenses.
Help! My Pixel Isn't Firing Correctly
A dead or misfiring Pixel is a marketer's nightmare. If the Meta Pixel Helper extension is showing errors or nothing at all, it's time to do some basic troubleshooting.
First, check the code itself. Is the snippet installed correctly in the <head> section of your website? A single typo or placing it in the wrong spot is all it takes to break the connection.
Next up, look for conflicts. Sometimes, other scripts or website plugins can block the Pixel from doing its job. Finally, make sure the event you’re trying to track (like AddToCart) is actually tied to the right action. The user has to physically click the "Add to Cart" button for that event to fire.
A friendly reminder: a Pixel event won't fire until a user performs the specific action it’s designed for. Simply loading a product page isn't enough to trigger a
PurchaseorInitiateCheckoutevent.
How Do I Navigate Tracking in a Post-iOS 14 World?
Apple's privacy updates really changed the game. The AppTrackingTransparency (ATT) framework took away a huge chunk of visibility advertisers had into what iOS users were doing.
This is exactly why setting up the Conversions API (CAPI) alongside your Pixel is no longer a "nice-to-have"—it's an absolute must.
CAPI sends data directly from your server to Facebook, bypassing browser-side limitations and helping you recapture some of that lost data. You should also be using Facebook's Aggregated Event Measurement to tell Meta which 8 conversion events are most important to your business.
Recent policy changes have also thrown a wrench in the works for certain industries. Some health and wellness brands, for example, can't optimize for high-intent events like "Purchase" anymore. If you're in a niche like that, you'll need to pivot your strategy toward upper-funnel goals like lead generation or engagement to stay compliant while still growing your audience.
Ready to close the tracking gaps and finally connect your ad spend directly to sales? LeadSavvy Pro syncs your Facebook leads straight into your CRM, giving you a crystal-clear, end-to-end view of your entire customer journey. Get started for free today at https://leadsavvy.pro.