How to Connect Facebook Leads to Google Sheets Easily
If you're still manually downloading CSV files from Facebook Ads Manager, you know the frustration. It's a time-consuming chore that, frankly, kills your momentum. The good news? You can completely skip that step by connecting your Facebook leads directly to Google Sheets.
This creates a seamless, automated workflow where new leads show up in your spreadsheet in real-time. It’s a simple change that gets your sales team the info they need instantly, ending the tedious manual work for good.
Why Automating Facebook Leads Is a Game Changer
Let's be honest: manually exporting lead data isn't just an inconvenience. It’s a major bottleneck that slows down your entire sales process.
Every minute you spend downloading, cleaning, and uploading those CSVs is a minute a competitor is already on the phone with your potential customer. That delay between a lead signing up and your team following up can be the difference between closing a deal and losing out.
Automating this with a tool like LeadSavvy Pro flips the script. You go from being reactive—checking for new leads whenever you remember—to proactive. Leads land in your designated Google Sheet the moment they come in. That real-time flow is what separates fast-moving teams from the rest.
Boost Speed and Efficiency
The number one benefit here is speed.
When a new lead instantly appears in a shared Google Sheet, your sales team can jump on it immediately. There's no middleman fumbling with data entry, which closes the gap where leads go cold. Plus, you eliminate the risk of human error. No more copy-paste mistakes or uploading the wrong file.
Getting lead data to your sales team in real time is one of the single most effective ways to boost your lead-to-customer conversion rates. That simple speed advantage makes a huge difference.
A Single Source of Truth
An automated connection gives you a clean, always-up-to-date database. Your Google Sheet becomes the single source of truth for your campaign's performance. This makes it so much easier to track ROI and analyze results without juggling a dozen different files.
Given that 40% of marketers rank Facebook among their top three platforms for generating ROI, managing that data efficiently is critical. If your data is a mess, you can't properly track what's working.
Let's quickly compare the two approaches.
Manual vs Automated Lead Management: A Quick Comparison
It's one thing to talk about it, but seeing the differences side-by-side really drives the point home.
| Metric | Manual Process | Automated Connection |
|---|---|---|
| Speed | Slow; requires periodic checks and downloads. | Instant; leads appear in real-time. |
| Efficiency | Low; involves repetitive, time-consuming tasks. | High; completely hands-off after initial setup. |
| Error Risk | High; prone to copy-paste errors, duplicates, or missed leads. | Near-zero; data is transferred accurately every time. |
| Scalability | Poor; becomes unmanageable with multiple campaigns. | Excellent; handles any volume of leads or campaigns effortlessly. |
As you can see, the automated connection wins on every front, freeing up your team to focus on what they do best: building relationships and closing deals.
This automated approach is also incredibly scalable. Whether you're running one campaign or fifty, the system just works, giving you a reliable data pipeline you can count on.
For a deeper look into optimizing your workflow, our guide on effective Facebook lead management offers more strategies to get the most out of your ads.
Choosing Your Integration Method

So, you're ready to connect your Facebook leads to Google Sheets. Great. But you'll quickly realize there isn't just one way to get it done. The right method really boils down to your budget, how comfortable you are with tech, and frankly, how many leads you're dealing with.
Think of it like choosing a vehicle. A scooter is perfect for a quick trip across town, but you wouldn’t take it on a cross-country haul. For that, you need a truck.
The most common path people take is using a third-party connector tool. You’ve probably heard of them—platforms like Zapier or Make that act as a bridge between Facebook and Google Sheets. They offer handy templates that make setup pretty simple, even if you're not a tech wizard. They're a solid choice for small businesses or marketers who just need a reliable, set-it-and-forget-it fix for a few lead forms.
Comparing Your Options
But here's the catch with those jack-of-all-trades platforms: the cost can sneak up on you. As your lead volume grows, your monthly bill can escalate quickly based on the number of "tasks" or "operations" you run. I've seen small agencies managing just five client accounts suddenly face a surprisingly high bill because their campaigns took off.
This is where a specialized tool like LeadSavvy Pro makes a huge difference. These platforms are built for one thing: marketing data automation. They give you a more focused, reliable, and often more cost-effective way to manage leads at scale, without the clutter of a multi-purpose tool.
Key Takeaway: General-purpose connectors are a decent starting point. But for serious marketers who need to scale without unpredictable costs, a specialized tool is almost always the smarter long-term play.
Let's lay out the main ways you can tackle this:
- Third-Party Connectors (e.g., Zapier, Make): Super user-friendly and versatile. They’re ideal for simple workflows, but watch out—they can get pricey as your lead volume or complexity grows.
- Specialized Tools (e.g., LeadSavvy Pro): Purpose-built for this exact job. You get a robust, scalable solution that’s laser-focused on reliability. For agencies or businesses with high lead flow, this is usually the most economical choice.
- Custom API Integrations: This is the most powerful and flexible route, but it requires a developer. If you want to build truly custom workflows, exploring a marketing automation API is the way to go. Just be prepared for the technical resources it demands.
Ultimately, your decision should match your growth plans. A simple connector might solve your problem today, but will it keep up when your campaigns are firing on all cylinders? Picking the right tool from the start saves you a massive migration headache down the road.
How To Connect Your Leads Using a Connector Tool
Alright, so you've decided a connector tool is the way to go. Smart move. Now it's time to roll up our sleeves and get this thing running. The good news is that the process to connect Facebook leads to Google Sheets is built for marketers, not developers. Seriously, you can have your first automated workflow up and running in less than ten minutes.
The whole process really boils down to authenticating your accounts. You'll simply give a tool like LeadSavvy Pro permission to access your Facebook Page and your Google Drive. This is a secure, standard step that lets the software see your lead forms on one end and write new data to your spreadsheet on the other.
Preparing Your Accounts for Integration
Before you even jump into your connector tool, a little prep work can save you a world of headaches later. Trust me on this one.
First, pop open Google Sheets and create a new, blank spreadsheet. Now for the most important part: create a header row with column names that exactly match the fields in your Facebook Lead Form.
For instance, if your form asks for "Full Name," "Email Address," and "Phone Number," you need to create three columns with those precise titles. Getting this right from the start makes the mapping process a breeze.
This quick visual breaks down how the information flows.
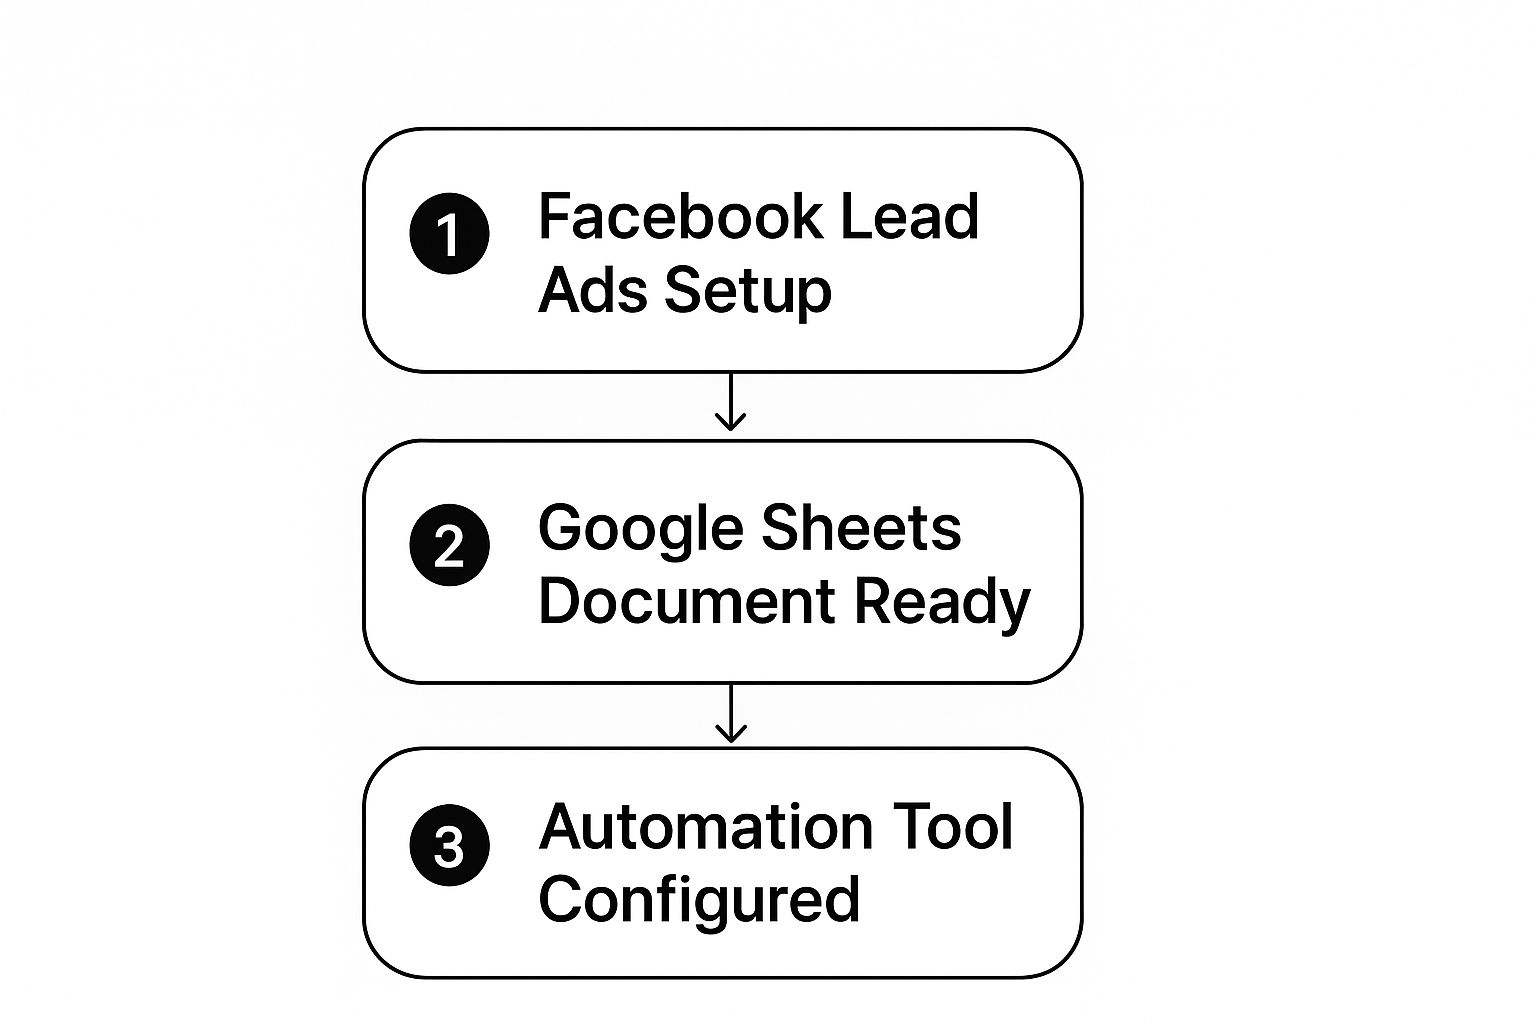
As you can see, the automation tool is the critical bridge here, grabbing the lead data from Facebook the moment it comes in and neatly placing it into your Google Sheet.
Building Your First Lead Workflow
With your accounts prepped and ready, it's time for the fun part: building the connection. Inside LeadSavvy Pro, the process is all about setting up a simple "trigger" and an "action."
- Trigger: This is what kicks off the automation. In our case, the trigger is a “New Lead” submitted on a specific Facebook Lead Form.
- Action: This is what you want to happen next. Here, the action is to “Create a Spreadsheet Row” in your Google Sheet.
You’ll first select your Facebook Page and then choose the exact lead form you want to pull leads from. The tool automatically shows you the fields from that form (like name, email, etc.).
Pro Tip: I always recommend creating a unique Google Sheet for each lead campaign. While it's possible to dump leads from multiple forms into one giant sheet, keeping them separate makes it so much easier to track ROI and see which campaigns are actually performing.
The interface guides you from picking your Facebook page all the way to mapping the form fields to your Google Sheet columns. If you've never set up an automation like this, it can be helpful to see how similar tools work. Many people get a good handle on the general principles by reading up on connecting your lead forms using Zapier.
Once you hit save, your automation is live. From that moment on, every new lead that fills out your form will pop up in your Google Sheet almost instantly. No more manual downloads.
For more specific tips and tricks on this setup, don't forget to check out our detailed guide on how to sync Facebook leads to Google Sheets with LeadSavvy Pro.
Mapping Your Facebook Lead Data Correctly
A successful connection between Facebook and Google Sheets lives or dies by one thing: correct data mapping. Get this wrong, and you’ll end up with a jumbled mess of data or, even worse, missing information altogether.
The core idea is simple. You’re just telling your automation tool, "When you see a 'Full Name' field in my Facebook Lead Form, put that information into the 'Full Name' column in my Google Sheet." This instruction is what makes sure every piece of data lands exactly where it belongs.
The best way to nail this is to prep your Google Sheet before you even start building your automation in a tool like LeadSavvy Pro.
Setting Up Your Spreadsheet for Success
First things first, create a new Google Sheet. That very first row is your header row, and it's crucial. This is where you’ll label your columns to perfectly match the fields in your Facebook Lead Form.
For the standard stuff, it's pretty straightforward. If your form asks for Email and Phone Number, you should create columns with those exact titles. Consistency is your best friend here.
But what about custom questions? This is where I see a lot of people stumble. If you ask a unique question like, "What is your biggest marketing challenge?", you must create a dedicated column in your Google Sheet for it. Give it a clear, matching title, like "Biggest Marketing Challenge."
A common mistake is forgetting to create a column for a custom question. If your automation tool doesn't have a designated spot to send that data, the information will simply be lost. Poof. Gone forever.
Once your data is flowing smoothly, you can take things to the next level. Think about using established sales pipeline templates for Google Sheets to start managing your new leads more effectively.
This kind of direct integration is a huge trend right now because it makes lead management incredibly efficient. Modern tools now make it possible to connect Facebook leads to Google Sheets in under two minutes. Seriously.
Troubleshooting Common Integration Issues
Even with the best tools, sometimes things just don't talk to each other correctly. It happens. If you've set up your Facebook leads to sync with Google Sheets and suddenly the data stops flowing, don't panic. From my experience, the fix is usually surprisingly simple.
Most of the time, the problem boils down to just a few usual suspects: account permissions, a specific form not showing up, or a simple data mapping error. A broken connection can bring your lead flow to a dead stop, so let's walk through how to find and fix the most common culprits.
My first piece of advice? If leads aren't appearing in your spreadsheet, the very first thing you should check is your account authentication. It's the "turn it off and on again" of the integration world.
Checking Account Permissions and Connections
Your go-to first step is to simply re-authenticate. Log into your LeadSavvy Pro dashboard and reconnect both your Facebook and Google accounts. You'd be amazed how often this single action gets everything running smoothly again, especially if a password was recently changed or a security token expired.
What if you're trying to set up a new connection but a specific lead form isn't even showing up as an option? This almost always points back to a permissions setting inside Facebook Business Manager.
Pro Tip: You absolutely must ensure that LeadSavvy Pro has been granted Lead Access permissions for your Facebook Page. Without this specific permission, Facebook won’t let our tool see or pull any data from your forms. It’s a critical, and often overlooked, step.
If you've double-checked permissions and are still stuck, the issue might be on the spreadsheet side of things. For a deeper dive into how lead data moves between systems, our guide on integrating Facebook Lead Ads with a CRM is a great resource.
Here's a quick checklist to run through:
- Confirm Lead Form Access: Head over to Facebook Business Manager. Navigate to "Integrations" and then "Leads Access." Make sure you see your connected tool (like LeadSavvy Pro) listed and that it has the proper access enabled.
- Check Your Column Headers: This one gets people all the time. Your Google Sheet column headers need to exactly match the field names in your Facebook form. A tiny typo like "FullName" instead of "Full Name" is enough to break the connection for that field.
- Send a Test Lead: Your best friend for troubleshooting is Facebook's own Lead Ads Testing Tool. Use it to send a test submission through your form. This instantly tells you whether the problem is with the form itself or the connection to your sheet.
Frequently Asked Questions

When you first start to connect Facebook leads to Google Sheets, a few questions always pop up. I’ve heard them all, so I’ve put together some quick answers to help you get your automation running smoothly from day one.
Can I Sync Multiple Forms To One Sheet?
Yes, absolutely. Most good automation tools, including LeadSavvy Pro, are built for this. You can easily set up separate workflows for each of your Facebook Lead Forms and have them all feed into a single master Google Sheet.
The trick is to make sure your spreadsheet columns are set up to handle all the different fields from every form. That way, you won't lose any data if one form asks for a "Company Name" and another doesn't.
Will My Old Leads Sync Automatically?
This is a big one, and the answer really depends on your tool. Many platforms will only start syncing new leads that come in after you’ve activated the connection.
A feature I always tell people to look for is a one-time import option for past leads. It's a lifesaver for getting all your historical data into one clean, organized spreadsheet. Always double-check if your chosen tool can do this before you commit.
How Do I Handle Custom Questions?
Handling custom questions is simpler than it sounds. First things first: you need to create a new column in your Google Sheet for each custom question. Make sure the column header is an exact match for the question you wrote in your Facebook form.
Then, when you're mapping your fields inside the automation tool, you’ll see your custom question pop up as a data point you can select. Just map it to the new column you created, and you’re all set. The answers will flow right in.
Ready to stop downloading CSVs and finally get your lead flow on autopilot? You can get started with LeadSavvy Pro for free and connect your first lead form in just a few minutes.