A Guide to Modern Facebook Ad Tracking
Let's be honest. If you're just looking at the default reports inside Facebook Ads Manager, you're flying blind. The numbers you see are no longer the whole story, and you're almost certainly missing key conversion data. This leads to one thing: wasted ad spend.
Why Your Facebook Ad Tracking Is A Mess
Relying on Facebook's built-in reporting is one of the most common—and costly—mistakes I see businesses make. A few years ago, it was good enough. Not anymore.
Today, a perfect storm of iOS privacy updates, browser-level cookie blocking, and the rise of ad blockers means your data has massive holes in it.
These gaps mean Facebook often loses sight of a customer after they click your ad. Someone might click, browse your products, and make a purchase, but if their browser blocks the tracking script, Ads Manager never gets the signal. This leads directly to sales you can't attribute and a completely skewed picture of your return on ad spend (ROAS).
The Real Price of Bad Data
The fallout from these data gaps is huge. When your tracking is incomplete, you can't tell which ads or audiences are actually working. You might turn off a winning ad just because its conversions weren't tracked, all while pouring more money into a dud that looks like a top performer.
This broken feedback loop poisons more than just your daily campaign results. It messes up your ability to build powerful Custom and Lookalike Audiences. If Facebook doesn’t have accurate data on who your best customers are, how can it possibly find more people like them? You end up retargeting the wrong people or building Lookalikes from a shaky foundation.
The bottom line: Today's advertising world requires a resilient tracking system. The goal isn't just to launch ads, but to build an infrastructure that gives you a true, complete picture of what's really happening.
Building a Bulletproof Foundation
To fight back against data loss and get a clear view, you need a multi-layered approach. There's no single magic bullet here. Instead, it’s about creating a robust system where different tools work together to fill in the gaps.
To get started, it's helpful to understand the core tools you'll be working with. Here’s a quick breakdown of the essentials for accurate Facebook ad tracking.
Core Facebook Ad Tracking Components
| Tracking Component | Primary Function | Best For |
|---|---|---|
| Meta Pixel | Captures user actions on your website from the browser side. | Foundation for all tracking; captures standard events like PageView, AddToCart, and Purchase. |
| Conversions API (CAPI) | Sends event data directly from your server to Facebook's server. | Bypassing browser-based blockers (like iOS 14+) and creating a more reliable data connection. |
| UTM Parameters | Adds tracking tags to your ad URLs for third-party analytics. | Seeing how Facebook traffic performs in tools like Google Analytics; getting granular ad-level insights. |
These three components are the bedrock of any serious tracking setup.
The competition is fierce. As of 2024, Meta is home to roughly 8 million active advertisers. Building a solid tracking system isn't just a "nice-to-have" anymore—it's the only way to make sure your budget is actually working for you. You can see more eye-opening statistics on WeCanTrack.com.
Now, let's walk through how to put these pieces together for a complete, accurate view of your ad performance.
Setting Up Your Foundational Tracking With The Meta Pixel
Think of the Meta Pixel as the brains behind your entire Facebook ad tracking system. It’s a tiny snippet of code that sits on your website, quietly watching what users do and reporting that intel back to your Facebook Ads Manager.
But just installing the basic code is like having a storefront with no cash register. You can see people walk in, but you have no idea who’s buying. That’s why just tracking "page views" isn't enough.
The real magic happens when you tell the Pixel what actions actually matter to your business. This is where standard events come in. These are predefined actions Facebook understands, like when someone adds a product to their cart, initiates a checkout, or makes a purchase.
You'll install the base Pixel code across every single page of your site. Then, you'll add specific event snippets only where they make sense. For example, the fbq('track', 'Purchase'); code belongs only on your final "thank you" or order confirmation page. This is how you start tracking valuable actions that directly grow your business, not just website traffic.
This infographic breaks down the essential workflow to get your Pixel running accurately.
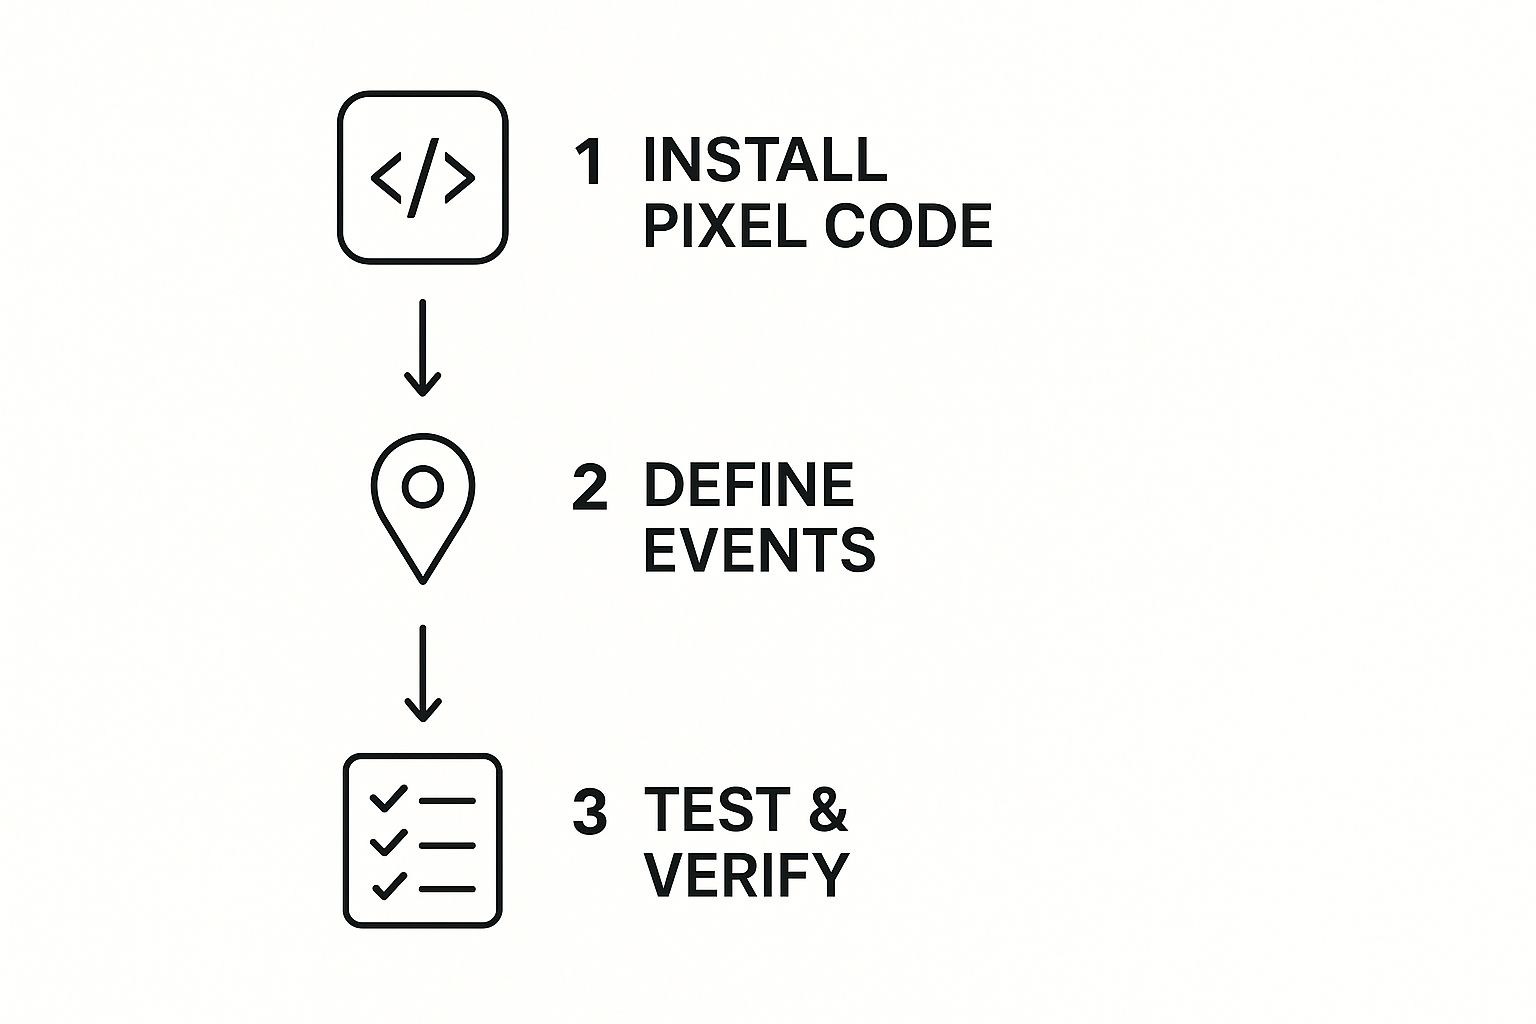
Nailing this sequence—install, define your key events, and then test everything—is critical. It’s the only way to build a reliable data pipeline between your website and Facebook.
Choosing Your Event Setup Method
When it comes to setting up those all-important events, you have two main routes: using Meta's Event Setup Tool or getting your hands dirty with a manual code installation. Each has its pros and cons, depending on how technical you want to get.
The Event Setup Tool is Meta’s code-free, point-and-click solution. You load your website inside the tool, click on buttons like "Add to Cart," and tell Facebook which standard event that button corresponds to. It’s a great starting point, especially if you’re not comfortable digging into your website’s code.
For ultimate precision and control, though, nothing beats manual implementation. By adding the event snippets directly into your site’s code, you get full authority over exactly when and how an event fires. This is the go-to method for tracking more complex actions or passing back dynamic data, like the exact purchase value and currency.
A huge mistake I see people make is relying only on the Event Setup Tool for a complex e-commerce site. It’s convenient, sure, but it can misfire or fail to capture those crucial dynamic values, throwing your ROAS calculations completely off. Manual setup takes more effort upfront but gives you data you can actually trust.
A Practical Scenario For Advanced Segmentation
Let’s say you sell high-end furniture. You notice that plenty of people are visiting your "Handcrafted Oak Dining Tables" category page, but very few are adding anything to their cart. With a basic Pixel, these visitors are just another number in your "page view" count. Pretty useless.
But with a proper event setup, you can get way smarter. By placing a specific ViewContent event on that category page—and adding custom parameters to identify it as the "Oak Tables" category—you unlock powerful retargeting.
- Your New Audience: Target users who triggered the
ViewContentevent for the "Oak Tables" category… - The Exclusion: …but who did not trigger the
AddToCartevent in the last 14 days.
Boom. You've just created a laser-focused audience segment. Now you can serve these specific users an ad with a special offer on oak dining tables or a video showing off the incredible craftsmanship. This kind of surgical advertising is flat-out impossible without precise event tracking.
Verifying Your Pixel Is Working Correctly
Once you've done all the work, how do you know if your Pixel is actually firing correctly? Never, ever assume it's working.
The Meta Pixel Helper is a free, non-negotiable Chrome extension that acts as your personal Pixel diagnostician.
As you click around your own website, the Pixel Helper icon will light up and show you exactly which Pixels and events are firing on each page. If it finds an error—like a typo in your Pixel ID or an event that isn’t loading—it gives you plain-English feedback on how to fix it. Get in the habit of using this tool, especially after you’ve made changes to your site. It’s the key to keeping your data clean, reliable, and ready to fuel profitable ad campaigns.
Building Resilient Tracking With The Conversions API

While the Meta Pixel is the foundation of good tracking, it's not invincible. We’ve all seen it—ad blockers, tough browser privacy settings, and even spotty network connections can stop the Pixel from firing. When that happens, you’re left with holes in your data.
That's where the Conversions API (CAPI) comes in. Think of it as your strategic backup, creating a much more resilient and reliable tracking system. CAPI establishes a direct, secure line from your server straight to Facebook's, completely bypassing the user's browser.
Because it's a server-to-server connection, it’s invisible to ad blockers and totally unaffected by browser-side privacy guards. When you run the Pixel and CAPI together, you get a powerful, redundant setup. The Pixel catches what it can from the browser, and CAPI swoops in to fill any gaps by sending data the Pixel might have missed.
Getting Started With Partner Integrations
The best part? You don't need to be a developer to get CAPI up and running. Meta has built some fantastic partner integrations with major platforms like Shopify and WordPress, making the setup a breeze. Often, it just takes a few clicks.
For instance, if you're on Shopify, connecting CAPI is as simple as setting up the official Facebook & Instagram sales channel app. This app links your store’s backend directly to Facebook, sending critical event data from Shopify's servers the moment an action happens.
- For Shopify users: Use the official "Facebook & Instagram" sales channel. It’s the most direct and reliable method for enabling both the Pixel and CAPI.
- For WordPress/WooCommerce users: Plugins like the "Meta for WooCommerce" extension do the heavy lifting, syncing your product catalog and turning on server-side events for you.
Using a partner integration gives you all the benefits of server-side tracking without touching a single line of code. For most businesses, this is absolutely the way to go.
How CAPI Captures What The Pixel Misses
Let's look at a real-world scenario. Imagine a potential customer is using a privacy-first browser armed with a heavy-duty ad blocker. They click your Facebook ad, land on your site, and fill out a form to get your latest guide.
Normally, their ad blocker would prevent the Pixel’s 'Lead' event from ever firing. From the Pixel’s point of view, that conversion just vanished.
But here’s where CAPI saves the day. As soon as the user hits "submit," their information hits your server. Your server, recognizing a new lead, uses its direct CAPI connection to send a 'Lead' event right to Facebook, complete with all the necessary user details. Facebook gets the event and correctly attributes that conversion to your campaign.
Without CAPI, that lead would have been invisible in your Ads Manager. This is absolutely critical for lead gen campaigns where every single conversion needs to be accounted for. You can dive deeper into optimizing your strategy by exploring different types of Facebook lead generation forms and how they pair with rock-solid tracking.
Key Takeaway: The Conversions API isn't meant to replace the Pixel—it's a powerful supplement. It's your safety net, making sure crucial events like purchases, leads, and sign-ups get recorded even when browser tracking fails.
Understanding Data Deduplication
So, if both the Pixel and CAPI are sending data, won't you end up with double-counted conversions? It’s a great question, and Facebook has a clever solution called data deduplication.
When you set up both tracking methods, you send a unique event ID for each conversion. The Pixel sends its event from the browser with a specific ID, and CAPI sends its event from your server with the exact same ID.
When Facebook sees two events with matching IDs, it knows they’re the same action. It then "deduplicates" them by keeping the more reliable server-side event and ignoring the browser-side one. This all happens automatically behind the scenes, ensuring you get maximum data capture without messing up your numbers. You get the best of both worlds.
Gaining Granular Insights With UTM Parameters
While the Facebook Pixel and Conversions API are great at telling you what people did on your site, they don't always paint the full picture of how they got there in the first place. This is where a little something called UTM parameters comes in. Think of them as the missing piece of your tracking puzzle.
UTMs (Urchin Tracking Modules) are simple tags you tack onto the end of your ad's website URL. They don't change the landing page one bit, but they feed a ton of valuable data straight into your analytics tools, especially Google Analytics.
This lets you see exactly how your Facebook campaigns are performing right alongside all your other marketing channels—like organic search, email, or direct visits.
Without UTMs, all your hard-earned Facebook ad traffic just gets dumped into a generic "facebook.com / referral" bucket in Google Analytics. It's a black box. You have no idea which campaign, ad set, or creative actually drove a specific visit or sale.
A Battle-Tested Framework For UTMs
Here's the thing about UTMs: consistency is everything. If your naming is all over the place, your data will be too, making it almost useless. To get clear, actionable insights, you need a solid naming convention for every single ad you run.
There are five main parameters to work with. Here's a simple, practical framework I've used for years:
utm_source: This is your traffic source. For Facebook and Instagram ads, it should always be facebook. Simple.utm_medium: This is the marketing channel. For paid social ads, a common best practice is to use cpc (cost-per-click) or paid-social. Pick one and stick with it.utm_campaign: Match this to your Facebook campaign name. This allows you to directly compare performance inside and outside of Ads Manager.utm_content: This is your golden ticket for A/B testing creatives. Use descriptive names like blue-sofa-video-ad or 10off-static-image to know which ad is the real winner.utm_term: While it's often used for keywords in search ads, you can get creative here. I like to use it to identify my ad set or audience, like new-homeowners-prospecting or website-visitors-retargeting.
Following a structure like this transforms your vague analytics data into a crystal-clear map of what’s actually driving results.
Real-World UTM Scenarios
Let's make this real. Imagine you're running two different ad campaigns: one to attract brand new customers and another to retarget people who left items in their cart.
Scenario 1: Prospecting Campaign
You're trying to reach new homeowners with a cool video ad showing off your latest furniture line.
utm_source=facebookutm_medium=cpcutm_campaign=fall-furniture-prospectingutm_content=new-line-video-adutm_term=new-homeowners
Scenario 2: Retargeting Campaign
Here, you're showing a static image ad with a discount to people who have visited your site in the past week.
utm_source=facebookutm_medium=cpcutm_campaign=q4-retargetingutm_content=15off-static-image-adutm_term=website-visitors-7d
Now, when you log into Google Analytics, you won't just see a vague blob of traffic from "facebook.com." You'll see precise data tied to each campaign, audience, and ad creative. You can finally analyze the user behavior, conversion rates, and even assisted conversions for every single effort.
This level of detail is how you confidently prove Facebook's value. You can show stakeholders exactly how the "fall-furniture-prospecting" campaign contributed to overall site revenue, right alongside your email and organic search efforts.
Luckily, Facebook's Ads Manager has a built-in "URL Parameters" tool that makes this incredibly easy. You can even use dynamic placeholders like {{campaign.name}} and {{ad.name}} to automatically pull your campaign and ad names into the UTMs. This is a massive time-saver that also prevents human error, ensuring your tracking stays clean and consistent as you scale your ads.
Using Your Tracking Data To Refine And Optimize Campaigns
Alright, so you’ve got data flowing in. That’s great, but collecting it is only half the battle. The real magic—and where you get a serious edge over the competition—is turning that stream of information into smarter, more profitable decisions.
With a solid tracking setup that combines the Meta Pixel and the Conversions API, you finally have clean, reliable data. No more guessing. You can now diagnose problems with surgical precision, right inside Facebook Ads Manager.
Think of it this way: your data is telling you a story about what your users are doing. Your job is to listen.
Diagnosing Campaign Bottlenecks
Here's a classic scenario I see all the time: a campaign is getting tons of AddToCart events, but the Purchase numbers fall off a cliff. With shaky tracking, you might just assume the ad creative is failing and start swapping out images and copy.
But with accurate data from both the Pixel and CAPI, you can see the truth. The ad is working perfectly! It’s driving high-intent traffic. The real problem is somewhere in your checkout process.
This insight is a game-changer. It tells you to stop messing with your ads and start investigating your checkout flow. Is a surprise shipping cost scaring people away? Is your payment form a confusing mess? Your facebook ad tracking data points you right to the bottleneck, saving you from wasting time and money on the wrong "fix."
By analyzing the entire conversion path—from the first click to the final purchase— you stop being a reactive advertiser and become a proactive strategist. You’re no longer just launching ads into the void; you're building a system that constantly shows you where to improve.
Building Superior Audiences
Clean conversion data is the rocket fuel for Facebook’s best audience-building tools. When your Purchase and Lead events are tracked reliably, the quality of your Lookalike and Custom Audiences goes through the roof.
- High-Performing Lookalikes: When you feed Facebook a complete list of your actual purchasers, its algorithm can build a much more precise Lookalike Audience. It finds the real common threads among your best customers, which almost always leads to lower acquisition costs when you're trying to find new ones.
- Hyper-Targeted Retargeting: Now you can create Custom Audiences based on specific, high-intent actions. For example, you can target users who triggered an
InitiateCheckoutevent in the last 3 days but never finished the purchase. This is an incredibly valuable group, and they deserve a unique, compelling ad to bring them back.
Ultimately, effective facebook ad tracking comes down to creating this powerful feedback loop. While many marketers get lost in the weeds, the core metrics to watch are often Page Engagements, CPM, Amount Spent, Ad Frequency, CTR, and CPC. If you want a deeper dive, Databox has a great breakdown of key Facebook metrics.
Of course, a solid tracking setup also makes your lead follow-up way simpler—a topic we cover in our guide to streamlined Facebook lead management.
Got your Facebook tracking set up? Awesome. But if you're like most advertisers, you've probably got a few lingering questions. It's totally normal for things to feel a bit complex as you get into the nitty-gritty. Let's clear up some of the most common questions I hear all the time so you can move forward with confidence.
Pixel vs. Conversions API: What’s the Real Difference?
This one trips a lot of people up, but it's simpler than it sounds.
Think of the Meta Pixel as your browser-side tracker. It lives on your website and sends data directly from a user's browser back to Facebook. The catch? It's vulnerable to things like ad blockers and Apple's iOS privacy updates, which can leave gaps in your data.
Now, the Conversions API (CAPI) is your server-side tracker. It creates a direct, much more reliable connection from your website's server to Facebook's server. This makes it far more resilient to the issues that affect the Pixel. The best approach isn't picking one over the other—it's using them together. This combination gives Facebook the most complete picture, filling in the gaps and making your tracking as accurate as possible.
How Do I Know If My Tracking Is Actually Working?
Once you've got everything in place, you absolutely have to test it. Don't just cross your fingers and hope for the best. Your go-to tool for this is the "Test Events" feature inside your Facebook Events Manager.
This tool gives you a live look at the data Facebook is receiving from your site. Here’s how to use it:
- Open "Test Events" and start navigating your own website.
- Perform key actions: view a product, add something to your cart, or make a purchase.
- Watch the feed. You should see events coming in from both the Pixel (browser) and CAPI (server).
This is also the perfect way to confirm that your data deduplication is working. If you see both a browser and a server event for the same action, but they are correctly combined into one, you're golden. The "Diagnostics" tab is also your friend—it will flag any ongoing problems before they mess up your campaign reporting.
For a deeper dive into maintaining a healthy setup, check out our guide to Facebook advertising best practices.
Can I Track Offline Conversions, Like In-Store Sales?
Yes, you can, and this is where the Conversions API really shines. You can track valuable customer actions that happen completely off your website, like phone orders or people buying something in your physical store.
To make this happen, you'll upload a file containing offline event data—think customer email addresses or phone numbers from your CRM that are tied to a sale—directly into Facebook. Facebook then gets to work, matching that data to user profiles and attributing those real-world conversions back to the ad campaigns that drove them. This finally gives you a complete, full-funnel view of your true advertising ROI.
Stop wasting time manually downloading CSVs and start converting leads faster. With LeadSavvy Pro, you can instantly sync every new Facebook lead to a Google Sheet or your CRM, with real-time notifications. Try it for free at https://leadsavvy.pro.